> For the complete documentation index, see [llms.txt](https://ideogram.gitbook.io/docs/llms.txt). Markdown versions of documentation pages are available by appending `.md` to page URLs; this page is available as [Markdown](https://ideogram.gitbook.io/docs/edit/studio.md).
# Studio
Edit images and text in Studio layers. Choose canvas or layer tools, preserve alternatives with versions, understand automatic saving, and export the version you want.
Studio is Ideogram's editor. It replaces the old Canvas and Magic Fill tools, and handles inpainting, outpainting, background changes and text. You work on a canvas made of layers: images and text. Some tools rework the whole canvas and give you new versions. Others change one layer and leave the rest alone.
## Open Studio
1. In the sidebar's **More** section, select **Studio**.
2. Under **Start with an image**, select **Browse Library** to choose an image you already have in Ideogram, or **Upload image** to pick a file from your computer.
Browse Library opens the existing image directly. You don't need to download and upload it first.
Uploads must be JPG, PNG or WEBP, up to 50 MB. Once an image is open, you can paste or drag more image files onto the canvas. Each one becomes a new layer.
To leave, select **Studio** at the top left. It reads **Exit** when you point at it.
## The layout
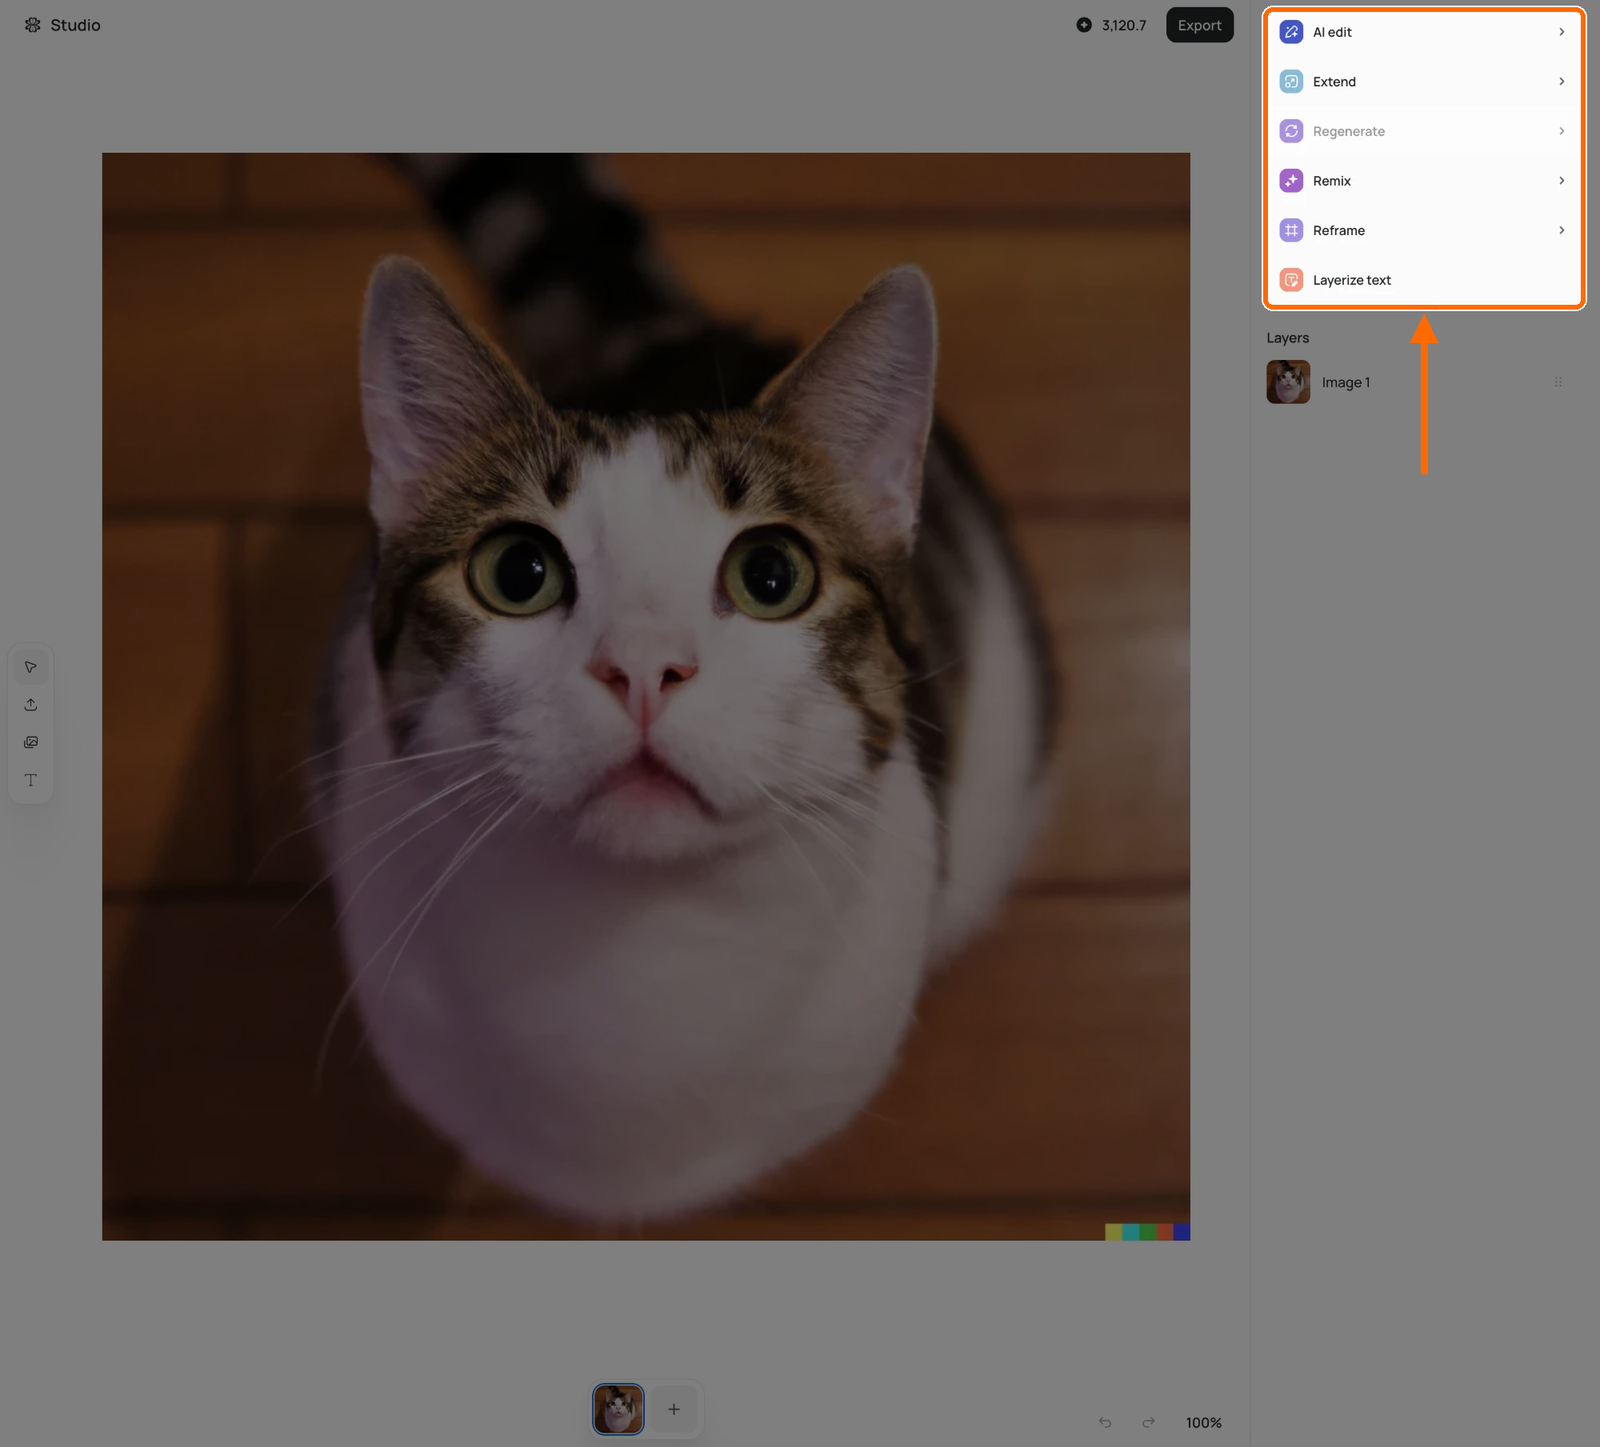
With nothing selected, the canvas tools sit at the top right.
* **Left toolbar**: **Select**, **Upload**, **My Images** (add an image from your library as a layer) and **Text** (add a text layer).
* **Right sidebar**: tools for whatever you've selected. With nothing selected, you get the canvas tools and the **Layers** list. Drag its edge to resize it.
* **Bottom**: the version strip.
* **Bottom right**: **Undo**, **Redo** and zoom (50% to 300%). Click the zoom badge to fit the canvas. Hold Space and drag to pan.
* **Top right**: your credit balance and **Export**.
### Choose the scope before running a tool
The selection determines what the tool changes. Click an empty area for a **canvas** operation that creates a new version. Select an image layer for a **layer** operation that changes that layer on the current version. If the tool list looks wrong, clear the selection or select the layer you mean to change.
Before trying a layer edit you may want to compare later, duplicate the current version with **+** in the version strip. Layer tools change the current version in place, so making a copy first gives you a separate alternative to return to.
Studio tools use credits, but the **Generate** buttons don't show a price. Watch the balance at the top right. See [how credits work](/docs/plans-and-billing/available-plans.md#how-credits-work).
## Canvas tools: make new versions
Click an empty spot so nothing is selected. Each of these tools works on the whole canvas and adds the result to the version strip.
| Tool | What it does | Plan |
| ----------------- | ------------------------------------------------------------------------------------------------------------------------------------------------------------------------------------------------- | -------------- |
| **AI edit** | Describe your edits and get edited versions. See [Edit the whole canvas with AI edit](#edit-the-whole-canvas-with-ai-edit). | Any |
| **Extend** | Grows the canvas and fills the new space from your description. See [Extend the canvas](#extend-the-canvas). | Paid |
| **Regenerate** | Runs the original prompt and settings again. Edit the prompt first if you like; bigger changes give a more different image. Greyed out for uploaded images. | Any |
| **Remix** | Uses the canvas as a base for new images. Describe your remix and set **Count** (1 to 4). A Strength slider appears with some models; see [Remix in Studio](/docs/edit/remix.md#remix-in-studio). | Paid |
| **Reframe** | Recomposes the image to fit a new aspect ratio. See [Reframe to a new aspect ratio](#reframe-to-a-new-aspect-ratio). | Any |
| **Layerize text** | Finds the text in the image and turns it into text layers you can edit. See [Text and Layers](/docs/edit/text-and-layers.md#layerize-text). | Any, signed in |
### Edit the whole canvas with AI edit
1. Click an empty spot so nothing is selected.
2. Select **AI edit**.
3. Describe your edits.
4. To add reference images, attach them with the paperclip (up to 14).
5. Set **Count** to the number of results you want (1 to 4).
6. Click **Generate**.
### Extend the canvas
1. Click an empty spot so nothing is selected.
2. Select **Extend**.
3. Drag the handles to grow the canvas.
4. Describe what should fill the new space.
5. Select **Extend**.
Output tops out at 2048 px on the long side. Extend needs a paid plan.
### Reframe to a new aspect ratio
1. Click an empty spot so nothing is selected.
2. Select **Reframe**.
3. Pick a new aspect ratio: 1:1, 3:2, 2:3, 4:3, 3:4, 5:4, 4:5, 16:9, 9:16 or 21:9.
4. Select **Reframe**. Ideogram recomposes the image to fit.
To remix the canvas, see [Remix in Studio](/docs/edit/remix.md#remix-in-studio).
## Layer tools: change one layer in place
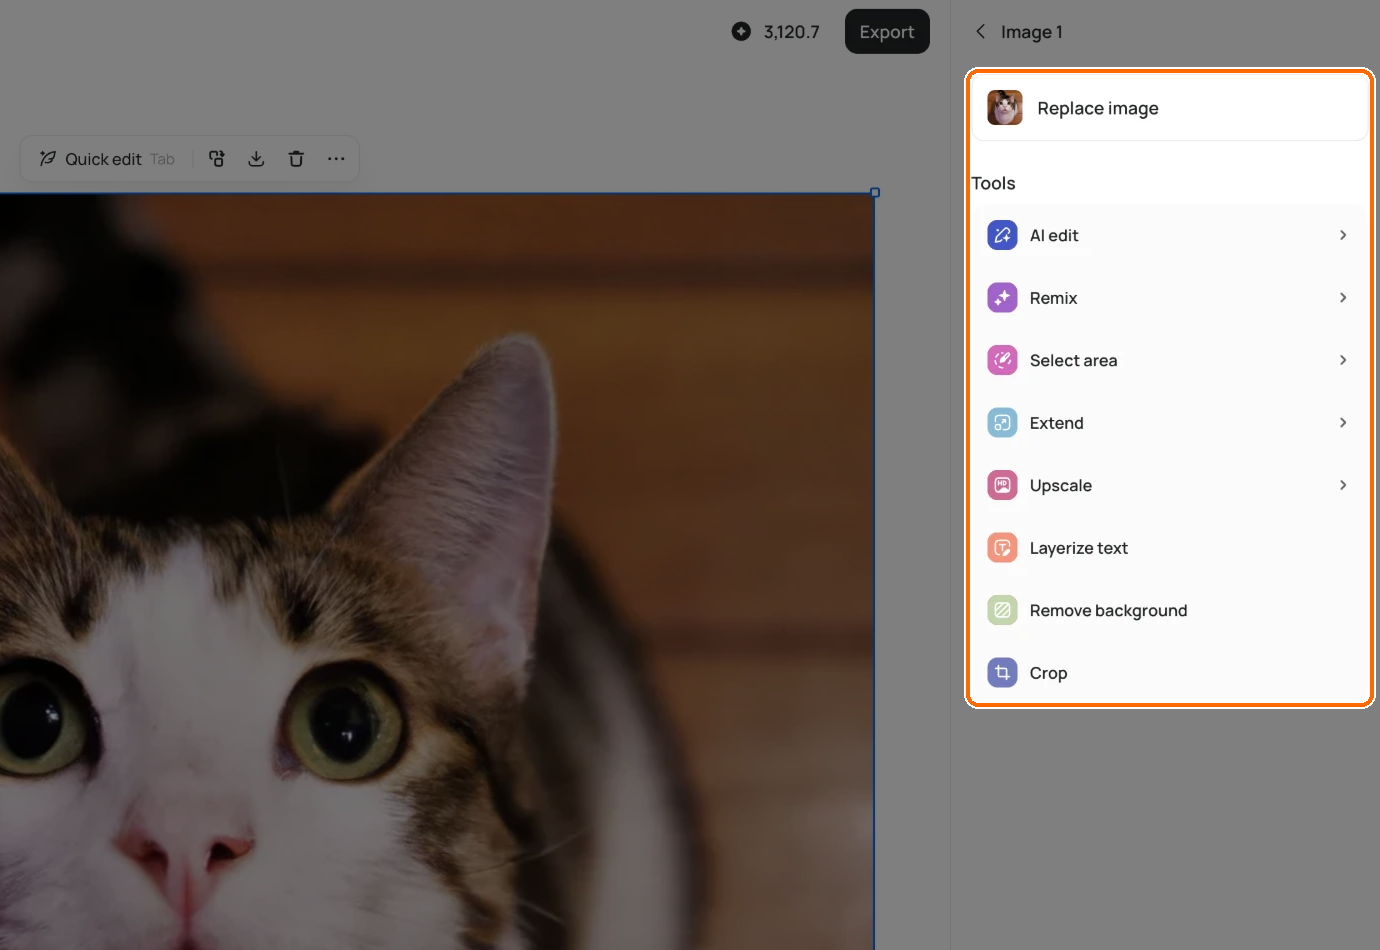
Click an image on the canvas to select it as a layer. The sidebar shows its name, a **Replace image** button and a **Tools** list. These tools change that layer only, on the current version. They don't add a new version.
Select an image layer to get Replace image and its Tools.
| Tool | What it does | Plan |
| --------------------- | -------------------------------------------------------------------------------------------------------------------------------------------------------------------- | -------------- |
| **Replace image** | Pick a file to swap in for this layer. | Any |
| **AI edit** | Describe a change for just this layer. You can attach reference images. | Any |
| **Remix** | Makes a variation that starts from this layer. | Paid |
| **Select area** | Changes only the part of the layer you paint over. See [Change part of a layer with Select area](#change-part-of-a-layer-with-select-area). | Paid |
| **Extend** | Pull the layer's edges out and describe what should appear in the new space. | Paid |
| **Upscale** | Adds detail and sharpness: **2x**, **4x** or **Ultra 8x**. Scales that exceed the supported output pixel count are greyed out; see [Upscale](/docs/edit/upscale.md). | Paid |
| **Layerize text** | Replaces the layer with the text layers it finds. | Any, signed in |
| **Remove background** | One click removes the background from this layer only. Uses credits. | Any |
| **Crop** | Crops the layer. See [Crop a layer](#crop-a-layer). | Any |
On desktop, a bar also floats over the selected layer. It has **Quick edit**, Duplicate, Download, Delete and More. On mobile, the layer tools sit in a toolbar under the canvas.
### Change part of a layer with Select area
1. Click the image layer to select it.
2. Under **Tools**, select **Select area**.
3. Set **Brush size** (10 to 80).
4. Paint over the part you want to change.
5. Describe what to change there.
6. Select **Generate**.
The rest of the layer stays as it was. Select area needs a paid plan.
### Crop a layer
1. Click the image layer to select it.
2. Under **Tools**, select **Crop**.
3. Drag the frame.
4. Click outside the frame to apply.
To cancel, press Esc.
### Open Quick edit
1. On desktop, click the layer to select it.
2. In the bar over the layer, select **Quick edit**. A prompt box opens with starters like "Change text to..." and "Remove...".
3. Describe your edit.
4. Click **Generate**.
You can also press **Tab** to open Quick edit.
Studio doesn't have Precise Edit or Object Remover. Use those as separate apps; see [Edit Images](/docs/edit/edit.md#single-purpose-apps).
## Versions
Each canvas tool run adds a thumbnail to the version strip at the bottom.
### Switch versions
1. Click a thumbnail in the version strip.
You can also use the ← and → keys. **Undo** also steps back through switches.
### Duplicate a version
1. Switch to the version you want to copy.
2. Select **+**. Studio duplicates the version, layers included.
3. Keep working on the copy.
### Delete a version
1. Point at the version's thumbnail in the strip and click the **×** on it.
2. Click **Delete image** to confirm.
Studio says this removes it "from the editor carousel."
## Saving
Studio saves for you. There's no Save button. Layer edits save to the same image as you work, and again when you switch versions or exit. If you try to leave while a layer tool is still running, Studio asks you to confirm, since you'd lose that result.
A saved version, an Undo step and a downloaded file serve different purposes. Use the **version strip** to keep separate alternatives, **Undo / Redo** to reverse edits or version switches during your editing session, and **Export** to save the current result to your device. Exporting does not replace the automatic saving of your Studio layers.
If the leave warning says a layer generation is still in progress, stay in Studio until it finishes if you want that result applied. Confirming **Leave Studio** gives up that pending layer result.
Studio has no Share or Publish. To share or publish, open the image's page. See [Sharing images](/docs/organize-and-share/share-and-publish.md).
## Export
**Export** opens the same menu as **Download** on the image page, for the version you're on.
### Export the current version
1. Switch to the version you want.
2. Select **Export** at the top right.
3. Pick a **File type**.
4. Pick a **Size**.
5. Click **Download**. If you picked a size larger than the original, the button reads **Upscale & download**.
Sizes larger than the original upscale the image first and cost credits. Some formats and sizes need a plan. See [Downloading images](/docs/organize-and-share/download.md).
### Download one layer
1. Select the layer.
2. In its floating bar, select Download.
This saves the layer's source file on its own.
## In this topic: editing
1. [Edit Images](/docs/edit/edit.md): choose the right way to edit
2. [Masks and Inpainting](/docs/edit/masks-and-inpainting.md): change only one area
3. **Studio** (this page): combine images, layers and text
4. [Text and Layers](/docs/edit/text-and-layers.md): fix or add lettering
5. [Remix](/docs/edit/remix.md): make new versions of an image
6. [Troubleshooting](/docs/help/troubleshooting.md): fix common problems